Lately, we have been actively engaged in building various tech projects using a powerful and versatile computer known as Raspberry Pi. However, we stumbled upon a remarkable discovery that we just couldn’t keep to ourselves. We found a fantastic 3D printing project that enables you to create a customized, robust, and sleek-looking rack mount case for Raspberry Pi 3b+. With this case, you can secure and organize your Raspberry Pi and give it a professional look that complements your server rack-mount space. And the best part is that this project is entirely free!
The Google Fiber Network Box, commonly known as the Google Fiber router is a modem and router in one device, allowing it to connect to the internet and provide wireless access to multiple devices within your home. The service is people’s favorite with dual-band WiFi, gigabit ethernet, network-attached storage and port forwarding, DMZ, and DHCP settings.
Although the router/modem comes with port forwarding enabled, ports are disabled and require a manual process to allow ports. So if you are looking for access to remote servers, improved online gaming, better file sharing, enhanced security, and improved video conferencing port forwarding is what you need.
By the end of this guide: You will configure port forwarding, will understand hurdles created by CGNAT and firewall, ports that need to be run, and an incentive that comes as a complete cure to port forwarding problems.
Let’s get started.
Miscellanies to collect
A web browser on a device connected to your Google router
Access to your Google router’s configuration page
The IP address of the device to which you’re forwarding ports
The port number or range you want to forward and open up to incoming connections
Stride to configure port forwarding on Google Fiber router manually
Here are some general steps to configure port forwarding on a Google Fiber Network Box:
Open a web browser on a computer connected to your Google Fiber network.
Type “192.168.1.1” in the address bar and press Enter. This will bring up the login page for the Network Box.
Enter the username and password for the Network Box. If you have not changed these from the default settings, the username should be “admin” and the password should be “password”.
Click on the “Advanced” tab at the top of the page.
Click on “Port forwarding” in the left-hand menu.
Click on the “Add” button to create a new port forwarding rule.
Enter the port number or range that you want to forward in the “External port” field. This is the port number that external devices will use to connect to your device or service.
Enter the internal IP address of the device or service that you want to forward the port to in the “Internal IP” field. This is the IP address of the device or service on your network that you want to allow external devices to access.
Enter the port number or range that the device or service is using in the “Internal port” field. This is the port number that the device or service is using on your network.
Choose the protocol (TCP or UDP) that the device or service is using from the drop-down menu.
Click on the “Save” button to save the port forwarding rule.
Once you have created a port forwarding rule, external devices should be able to connect to your device or service using the specified external port number.
Listing the default ports
The Google fiber router uses various ports for different purposes. Here are some of the most common ports used by the Google router:
Port 80: For HTTP web traffic, used by the router’s web interface to allow users to manage and configure the router settings.
Port 443: HTTPS web traffic, used by the router’s web interface to allow secure communication between the user’s web browser and the router.
Port 53: Used for DNS traffic, to resolve domain names to IP addresses.
Port 21: Used for FTP traffic, to allow file transfers between devices on the network.
Port 22: For SSH traffic, to allow secure remote access to the router’s command line interface.
Port 23: For Telnet traffic, allow remote access to the router’s command line interface.
Additional ports for various services or applications might be used by your router. It is always a good idea to consult the router’s documentation or support resources to determine which ports are being used and for what purpose.
In this guide, we will show you how to increase the swap file on your Raspberry Pi
Before beginning this section, make sure you aren’t running anything that’s heavily using the memory. The reason for this is that it could potentially already be using the swap file that we are about.
1. Before we can increase our Raspberry Pi’s swap file, we must first temporarily stop it.
The swap file cannot be in use while we increase it.
To stop the operating system from using the current swap file, run the following command.
sudo dphys-swapfile swapoff
2. Next, we need to modify the swap file configuration file.
We can open this file using nano by using the command below.
sudo nano /etc/dphys-swapfile
3. Within this config file, find the following line of text.
You can use CTRL + W to search for text within the file.
CONF_SWAPSIZE=100
To increase or decrease the swap file, all you need to do is modify the numerical value you find here.
This number is the size of the swap in megabytes.
For example, if we wanted to increase our swap size to 1GB, we would change that line to the following.
CONF_SWAPSIZE=1024
Whatever size you set, you must have that space available on your SD card.
4. Once you have made the change, save the file by pressing CTRL + X, followed by Y, then ENTER.
5. We can now re-initialize the Raspberry Pi’s swap file by running the command below.
Running this command will delete the original swap file and recreate it to fit the newly defined size.
sudo dphys-swapfile setup
6. With the swap now recreated to the newly defined size, we can now turn the swap back on.
To start the operating systems swap system, run the following command.
sudo dphys-swapfile swapon
While the new swap file is now switched on, programs will not know that this new memory exists until they restart.
7. If you want all programs to be reloaded with access to the new memory pool, then the easiest way is to restart your device.
To restart your Raspberry Pi, all you need to do is run the command below.
sudo reboot
We hope you have successfully learned how to increase and decrease the swap file on your Raspberry Pi.
Here are several free chat room services that allow you to create your own room for free. They either provide a simple link to that room or let you add that chat room to your site. Ready to start? Here are some of the best online chat rooms that you can easily add to your website.
Chatzy lets its users create public and private chat rooms. It provides a link to that room, which you can easily link to on a webpage or in an email. The site offers several ways to customize the chat experience to suit your needs. If you register on the site, you can view your Chatzy room list, making your chats easy to keep track of.
You can easily create a chat by selecting Start Quick Chat. After you input your name and subject, you can enter the room. Clicking Invite/Share on the left menu bar will provide you with a share link.
To embed a private chat room on your website, head to Hosted Rooms on the left menu bar. This page gives you instructions on how to customize your chat room, as well as how to embed the provided code into your site.
Tlk.io lets you simply start an online chat room, making it one of the best chat room sites like Chatzy. As soon as you enter the website, Tlk.io asks you to input a channel name, as well as your nickname. Clicking Join brings you to your very own chat room. Copy and paste the chat room’s URL in the address bar to place in emails or on your social media page.
To embed Tlk.io into your website, scroll down on the homepage until you see a button that says Get Embed Code. This option allows you to name your channel, choose a chat room height, and even pick a theme. Copy the generated code on the right side of the screen, and add it to your website to make a chat room instantly. Tlk.io’s convenience can even make it a great team communication alternative to Slack.
To get started on Dead Simple Chat, you have to register for an account. After that, the site will direct you to your dashboard where it shows you the shareable link to your chat room, and also gives you the code to embed it on your website.
If you want to customize your chat room, click Chat Rooms on the left menu bar. Under the chat room of your choice, click Chatroom settings. You can then change the sidebar and background color of your chat room, as well as change its name. When you’re done, click Update Chat Room, and then hit Embed Chat Room to copy and paste the code into your webpage.
Dead Simple Chat also offers several paid plans. With the Pro Plan, you can have up to 2,000 different users, an unlimited amount of chat rooms, and storage for up to 180 days.
All of these perks prove that you don’t need the features of Facebook Messenger in order to communicate effectively.
Like Dead Simple Chat, Minnit also requires you to sign up in order to create a chat room. Once you create your account, navigate to the Quick Links dropdown menu, and click Create your own chatroom in less than a minute. Input your chat room name, and description, and then decide if you want to make your chat private or public.
Minnit will then create your chat and will ask you which plan you want. The free plan offers unlimited messages, up to 40 users, and lets you censor certain words. If you decide to upgrade to one of the paid plans, you’ll get more customization options.
When you’re ready to embed your chat room into your site, head to the page of your chat room, and then select Embed Your Chat. If you have already set up a WordPress blog, you can use the Minnit plugin to add a chat room. You can also use the Wix plugin to add Minnit to your website, or you can simply copy and paste its code onto your own domain.
If you’ve tried embedding a chat room into your website in the past, you might remember ParaChat. Since ParaChat has closed, RumbleTalk serves as its alternative. You must register for an account before you create your chat room with RumbleTalk.
To customize your chat room, head to Design in the top menu bar. You can then insert a background image, edit text color, change your font, and even add a skin.
If you want to monetize your chat, RumbleTalk has settings for that as well. Head to Monetize on the top menu bar, and input your PayPal information. Rumbletalk also offers paid plans for an increased amount of chat seats and rooms.
When you’re ready to embed your chat room, click Embed on the top of the page. Select Get Code to copy and paste the code right on your website.
WebCopy by Cyotek takes a website URL and scans it for links, pages, and media. As it finds pages, it recursively looks for more links, pages, and media until the whole website is discovered. Then you can use the configuration options to decide which parts to download offline.
The interesting thing about WebCopy is you can set up multiple projects that each have their own settings and configurations. This makes it easy to re-download many sites whenever you want; each one, in the same way every time.
One project can copy many websites, so use them with an organized plan (e.g., a “Tech” project for copying tech sites).
How to Download an Entire Website With WebCopy
Install and launch the app.
Navigate to File > New to create a new project.
Type the URL into the Website field.
Change the Save folder field to where you want the site saved.
Play around with Project > Rules
Navigate to File > Save As… to save the project.
Click Copy in the toolbar to start the process.
Once the copying is done, you can use the Results tab to see the status of each individual page and/or media file. The Errors tab shows any problems that may have occurred, and the Skipped tab shows files that weren’t downloaded. But most important is the Sitemap, which shows the full directory structure of the website as discovered by WebCopy.
To view the website offline, open File Explorer and navigate to the saved folder you’d earlier designated. Open the index.html (or sometimes index.htm) in your browser of choice to start browsing. As you can see, this is very different from saving individual web pages through apps, another practice that is also all too common nowadays.
HTTrack is more known than WebCopy, and is arguably better because it’s open-source and available on platforms other than Windows. The interface is a bit clunky and leaves much to be desired, however, it works well, so don’t let that turn you away.
Like WebCopy, it uses a project-based approach that lets you copy multiple websites and keep them all organized. You can pause and resume downloads, and you can update copied websites by re-downloading old and new files.
How to Download Complete Website With HTTrack
Install and launch the app.
Click Next to begin creating a new project.
Give the project a name, category, and base path, then click on Next.
Select Download website(s) for Action, then type each website’s URL in the Web Addresses box, one URL per line. You can also store URLs in a TXT file and import it, which is convenient when you want to re-download the same sites later. Click Next.
Adjust parameters if you want, then click on Finish.
Once everything is downloaded, you can browse the site normally, simply by going to where the files were downloaded and opening the index.html or index.htm in a browser.
How to Use HTTrack With Linux
If you are an Ubuntu user, here’s how you can use HTTrack to save a whole website:
Launch the Terminal and type the following command:sudo apt-get install httrack
It will ask for your Ubuntu password (if you’ve set one). Type it in, and hit Enter. The Terminal will download the tool in a few minutes.
Finally, type in this command and hit Enter. For this example, we downloaded the popular website, Brain Pickings.httrack https://www.brainpickings.org/
This will download the whole website for offline reading.
You can replace the website URL here with the URL of whichever website you want to download. For instance, if you wanted to download the whole Encyclopedia Britannica, you’ll have to tweak your command to this:
If you’re on a Mac, your best option is SiteSucker. This simple tool copies entire websites maintains the same structure and includes all relevant media files too (e.g., images, PDFs, style sheets).
It has a clean and easy-to-use interface—you literally paste in the website URL and press Enter.
One of its nifty features is the ability to save an in-progress download to a file, then use that file to download the same files and structure again in the future (or on another machine). This feature is also what allows SiteSucker to pause and resume downloads.
SiteSucker costs about $5 and does not come with a free version or a free trial, which is its biggest downside. The latest version requires macOS 11 Big Sur or higher. Old versions of SiteSucker are available for older Mac systems, but some features may be missing.
Wget is a command-line utility that can retrieve all kinds of files over the HTTP and FTP protocols. Since websites are served through HTTP and most web media files are accessible through HTTP or FTP, this makes Wget an excellent tool for downloading entire websites.
Wget comes bundled with most Unix-based systems. While Wget is typically used to download single files, it can also be used to recursively download all pages and files that are found through an initial page:
wget -r -p https://www.makeuseof.com
Depending on the size, it may take a while for the complete website to be downloaded.
However, some sites may detect and prevent what you’re trying to do because ripping a website can cost them a lot of bandwidth. To get around this, you can disguise yourself as a web browser with a user agent string:
wget -r -p -U Mozilla https://www.thegeekstuff.com
If you want to be polite, you should also limit your download speed (so you don’t hog the web server’s bandwidth) and pause between each download (so you don’t overwhelm the web server with too many requests):
wget -r -p -U Mozilla --wait=10 --limit-rate=35K https://www.thegeekstuff.com
How to Use Wget on a Mac
On a Mac, you can install Wget using a single Homebrew command: brew install wget.
If you don’t already have Homebrew installed, download it with this command:/usr/bin/ruby -e "$(curl -fsSL https://raw.githubusercontent.com/Homebrew/install/master/install)"
Next, install Wget with this command:brew install wget
After the Wget installation is finished, you can download the website with this command:wget path/to/local.copy http://www.brainpickings.org/
On Windows, you’ll need to use this ported version instead. Download and install the app, and follow the instructions to complete the site download.
5. Teleport Pro
Get Teleport Pro. Seriously. Although the last version of the app was released back in 2015, the app works just as fine as it did back then.
Apart from simply downloading a whole website, the app packs a host of other features and intricacies as well. For instance, when you download and install the app, in the app’s main menu you’ll see these options to choose from:
Create a copy of website on hard drive.
Duplicate an entire website along with its directory structure.
Look up a site for specific types of files.
Search a website for given keywords.
Navigate all the sites linked from a central site.
These and a slew of other similar features make this app a handy program for your toolkit. The only downside we found was that of a limit on the free version. Using the unregistered version, you can only copy 500 pages in a single project. Moreover, you can only use it for a total of 40 times, after which you’ll have to purchase the premium version.
Are you looking for a way to move your website from Weebly to WordPress? Weebly is a great web-building platform for beginners, but you’ll eventually realize that it limits you in terms of features. That’s when it’s time to turn to WordPress, the most powerful website builder on the market.
In this article, we’ll show you how to move your website from Weebly to WordPress.
Why Should You Move Your Website From Weebly to WordPress?
Ready? Let’s go!
Step 1: Setting Up WordPress
The first thing you’ll need before setting up WordPress is a domain name and web hosting. A domain name is your website’s name like example.com or isitwp.com; and web hosting is the space on the internet where you upload your content, media files, etc. You should check out our article on the differences between domain name and web hosting for more details.
Normally, domain names have different prices based on TLDs and domain registrars. A simple domain name costs between $11 & $15 per year. However, you can purchase web hosting in the range of $7 & $15 per month for a starter / basic website.
If you’re looking for alternative options, then check out our expert picks of the best WordPress hosting providers. Most of them are offering discounts to IsItWP users.
After purchasing your domain name and web hosting, go ahead and install WordPress. For easy instructions, you can check out our complete WordPress installation guide.
Once installed successfully, you can begin the process of moving your Weebly website to WordPress.
This tool helps export all your content and media files from Weebly in a format that’s supported by WordPress. Because of this, you can easily import your website data into WordPress using an importer plugin.
Note: We tested this tool before recommending it to our users. It works perfectly without breaking anything.
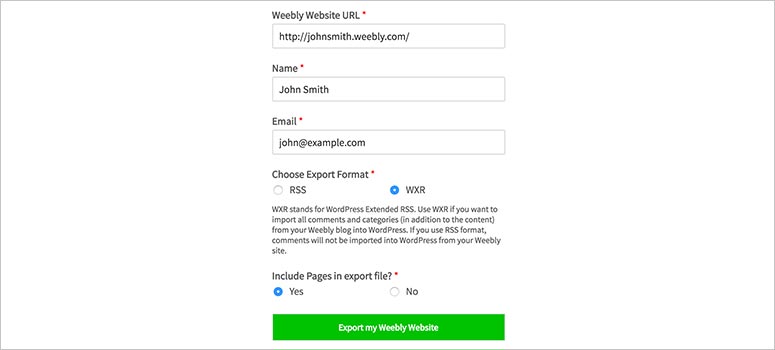
After that, enter your name, email address, and choose a format to export your Weebly site. We recommend you to export your website in the default WXR format.
It’ll also ask if you want to export website pages with other content. By default, it’s marked Yes which means the pages will be exported. You can mark this option as No if you don’t want the pages to be exported or simply proceed without changing anything.
Click on the ‘Export my Weebly Website’ button to continue.
The importer will process in the background. Once ready, it’ll show you a success message with a downloadable link that you can use to import your Weebly website into WordPress.
You’ll need the XML file for WordPress. Simply right-click on the ‘Download Your Weebly Export File’ button and select the ‘Save Link As…’ option. It’ll download the export.xml file you need for WordPress.
Step 3: Importing Your Weebly Website to WordPress
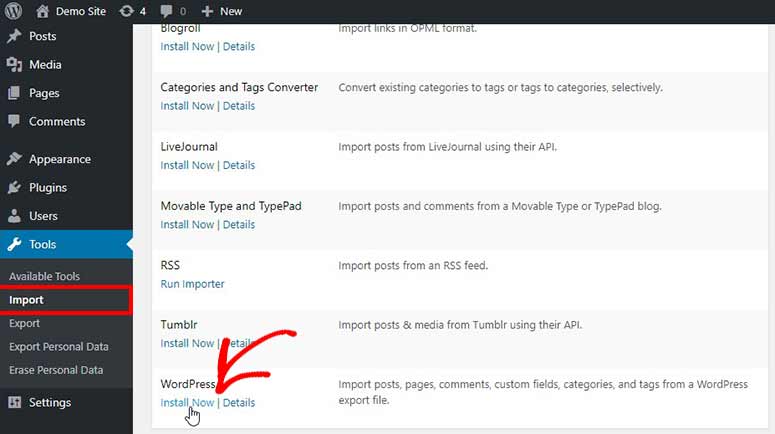
To import your Weebly website, you’ll need to log into your WordPress admin area. From there, you’ll need to go to the Tools » Import page. On this page, you’ll see multiple importers but you’ll need to use the WordPress importer.
Go ahead and click on the ‘Install Now’ link below the WordPress importer and it’ll be installed without changing or loading the page.
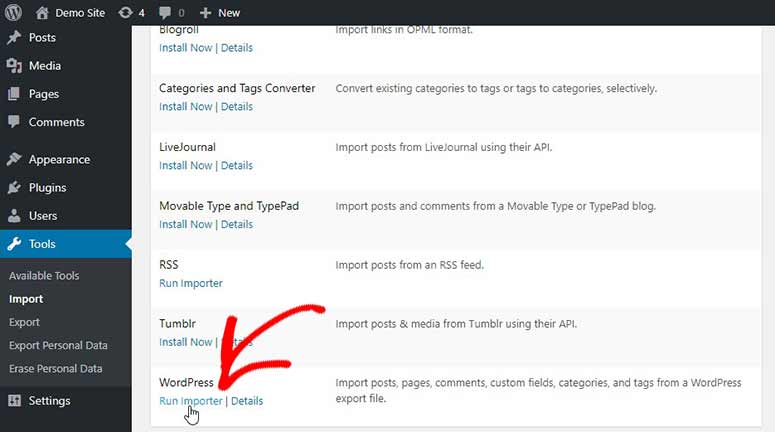
After the successful installation, you’ll see that the options are now changed. Click on the ‘Run Importer’ link below the WordPress importer to continue.
Next, you should click on the ‘Choose file’ button and select the export.xml file that you downloaded in the previous step.
Make sure to click on the ‘Upload file and import’ button. It’ll take you to a new page where you need to assign authors to your content.
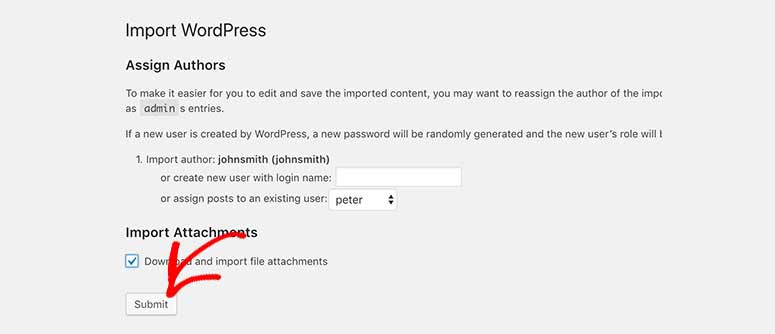
There’ll be multiple options for you, including importing your authors from Weebly, creating new authors, or assigning the articles to existing users in WordPress.
You’ll also need to mark the ‘Download and import file attachments’ setting which will help import your images and media files from Weebly to WordPress.
Once you’re ready, click on the ‘Submit’ button and the importer will run in the background. It’ll take some time depending on the size of the content and media files, so be patient.
After successfully importing your Weebly website, it’ll show you a message to update your credentials (password and user roles).
What’s next?
You can go ahead and check your WordPress pages, posts, and other content to make sure that everything is fine. We also recommend you check your media files that have been imported from Weebly.
However, if you find out that the importer missed some of your content, then you can repeat the process to import the remaining content from Weebly to WordPress. Don’t worry about the repetition as the importer will only import the leftover content.
Step 4: Creating Redirects
When using a custom domain name (https://example.com) for your Weebly website, you’ll need to redirect it to your new WordPress hosting. This’ll enable your users to see your web pages correctly.
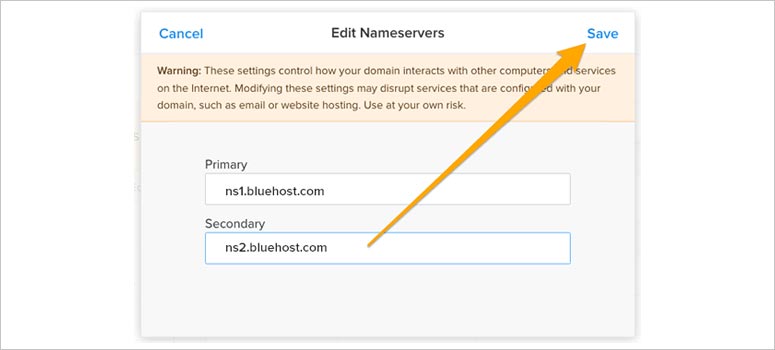
To create redirects, you’ll need to log into your Weebly admin account and visit the ‘Domains’ page. From there, you’ll need to click on your custom domain and go to the settings menu. You’ll find the option to edit nameservers.
Simply click on the ‘Change’ button, and it’ll show the primary and secondary nameservers fields. If you purchased Bluehost web hosting, then the nameservers will be ns1.bluehost.com and ns2.bluehost.com
Note: If there’re any errors with these nameservers, then you can contact the support team for help.
Make sure to click on the ‘Save’ button.
It’ll take 24-48 hours for the nameservers to update properly. After that, your users will see your WordPress website.
If your Weebly website was built on a subdomain (https://mysite.example.com), then you should follow these steps:
First, you’ll need to log in to your Weebly account and edit your site. From there, you can go to Settings » SEO.
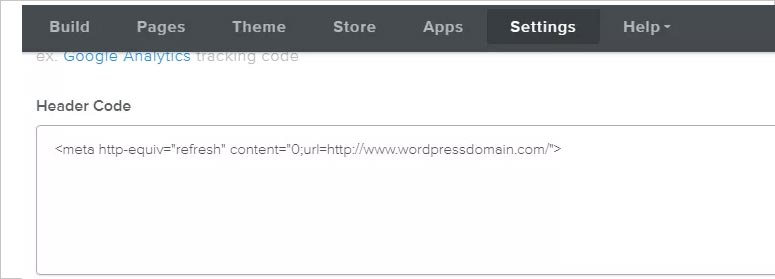
In these settings, you’ll need to search for the header code section and add this line of code:
Once replaced, you’ll need to click on the Save and Publish buttons. Next, visit your Weebly site URLs, and the page will be redirected to your new WordPress site.
Step 5: Managing Permalinks / URL Structure
You’ll need to fix the URL structure for your users. Otherwise, they may see a 404 error on your web pages after migration. This error occurs because the URL didn’t match up during the redirection.
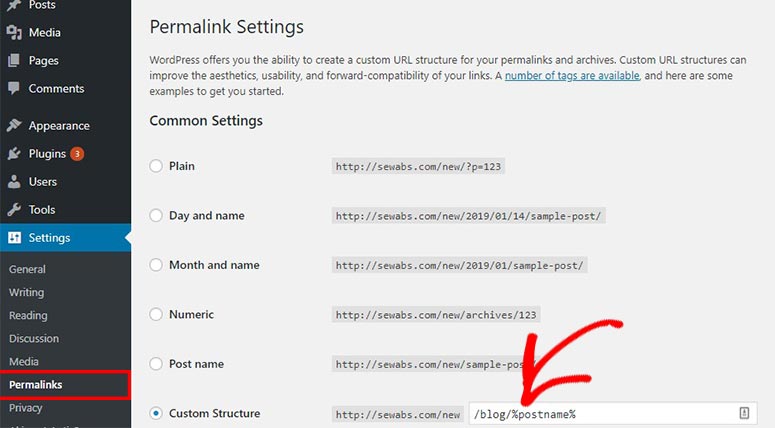
To fix the permalinks / URL structure, you’ll need to go to the Settings » Permalinks page in your WordPress admin area. From there you’ll need to select the custom structure for URLs and enter /blog/%postname% in the given field.
Once added, click on the ‘Save Changes’ button. That’ll fix the issues with your posts.
But Weebly uses .html in the URLs for pages which means you need to manage that issue separately from posts.
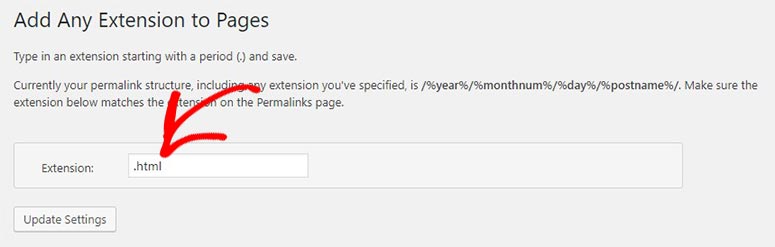
Once activated, you’ll need to go to Settings » Add Any Extension to Pages to manage the options. In the ‘Extension’ field, you’ll need to add .html and click on the ‘Update Settings’ button.
After that, you can go back to the Settings » Permalinks page and hit the ‘Save Changes’ button to properly update your WordPress URLs.
Step 6: Customization and Plugins
Your site has been moved from Weebly to WordPress successfully.
Next, you can check out our article on the best WordPress plugins that you MUST use. These plugins will help add more features and functionalities to your website.
We also recommend you check out our selection of the best WordPress themes for specific niches:
These themes were selected by our experts. However, with a little searching, you can find many other WordPress themes on the internet that match your interests and needs.
Step 7: Troubleshoot Errors
We want to make sure that you don’t see any errors, so we’ve listed a few common issues that users may face after migration. Take a look:
Generally, the WordPress importer should import all your images from Weebly and store them in the WordPress media library. However, if you find out that the images were not properly imported, then we recommend you follow this guide on how to import external images in WordPress.
So that’s about how to export Weebly site to WordPress properly.
We hope this guide helped you learn how to move Weebly to WordPress. If you liked this article, then you may also want to check out our guide on how to switch from Wix to WordPress.
IP Control Bundle. This tool focuses on reporting and monitoring the network’s accessible and used IP addresses.
Network Bandwidth Analyzer. A monitoring tool for network performance. It lets you determine nodes that use too much bandwidth.
Skyboxsecurity. This network scanner easily decodes the most intricate and complicated networks.
ThousandEyes. A network monitoring tool specialized in diagnosing and triaging network problems for quick remediation.
BeyondTrust. An excellent overall free network scanner that monitors the network’s essential stats and detects problems.
Qualys. A streamlined security solution that can also work across cloud systems.
Spiceworks. An easy-to-use scanner with real-time alerts for your vital devices.
Site24x7. An integrated tool to keep vigilance over servers, apps, websites, and clouds simultaneously.
Nagios. It is an open-source continuous monitoring tool.
Nessus. A very versatile network scanner intended to make your experience easy and intuitive.
GFI LanGuard. A scanner focused on mobile devices and patch management for several operating systems.
Advanced IP Scanner. A free scanner packs a lot of punch with features usually not found in scanners.
Domotz. A scanner for analyzing the most advanced network data and for remote control.
Essential NetTools. It’s a scanning suite of tools offering many useful features for network administration.
LogicMonitor. It works on Linux and Windows, providing a range of options for alerts, performance graphs, and user management.
Nikto2. One of the best preventive scanners, ready to detect more than 7000 risky applications.
SoftPerfect Network Scanner. It supports IPv6 addresses and detects those elusive hardware MAC addresses. It runs from a USB stick without installation.
Nexpose Rapid7. A real-time scanner aimed to find new threats so you can neutralize them on time.
Snort. An intrusion detection and prevention suite of network tools.
Wireshark. Another open-source scanner exhibiting multi-platform capabilities.














You must be logged in to post a comment.